Authentication
Here is a quick description of authentication and authorization in the context of access to APIs:
- Authentication: This is the process of verifying your identity. When you make an API request, you prove your identity by providing a valid API Key.
- Authorization: Once authenticated, this is the process of confirming that you have permission to access a specific API resource or perform an action.
Connection Flow
All API endpoints require authentication. A valid API Key must be included when sending a request. If you do not have an API Key or your previous key has expired, you will need to obtain a new one by completing the following steps:
1
Access REST API Management Page
Log-in to the Forth CRM and navigate to the API Credentials Management Page.
2
Generate a Secret / Key Pair
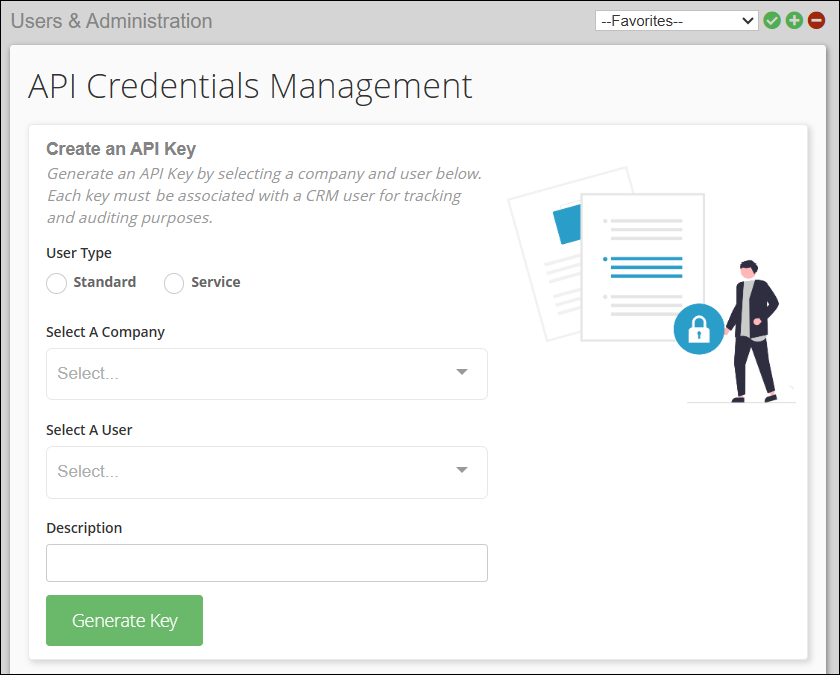
On the API Credentials Management Page:
- Select the User Type (Standard or Service)
- Choose a Company via the dropdown menu
- Select a User via the dropdown menu
- Enter a Description
- Click the Generate Key button at the bottom left of the section
- A pop-up screen will appear, displaying your API Secret and Key ID (see example below).
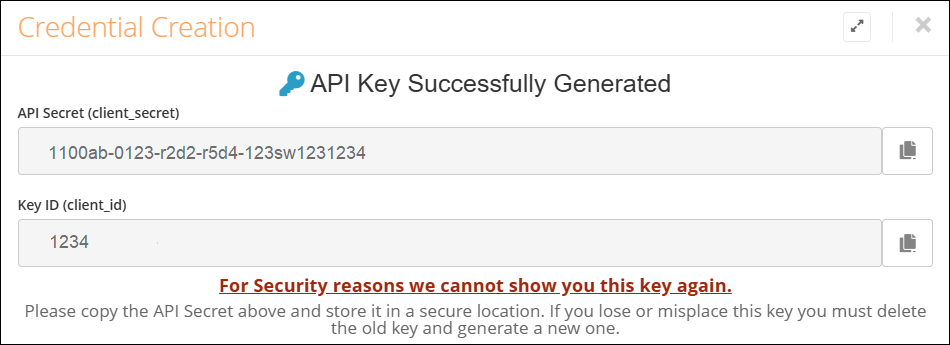
Copy and save both values in a secure location like a secrets or password manager. The API Secret will not be shown again.
3
Obtain Access Token
Use the Get Access Token endpoint to swap your API Secret and Key ID for an access token. The access token expires after 10 days and must be refreshed using this endpoint before the expiration date.
Our APIs use Api Key-based authentication/authorization schemes to create a session. You must pass this access token in the Api-Key header in every HTTP request made to a Forth API endpoint.
On this page
- Authentication
Error Codes
The Forth API uses conventional HTTP response codes to indicate the success or failure of an API request. In general, response codes fall into these categories:
- 2xx (Success): The request was successfully received, understood, and accepted.
- 4xx (Client Error): The request failed due to an issue on your end (e.g., missing parameter, invalid data, lack of permissions).
- 5xx (Server Error): An unexpected error occurred on Forth’s servers. These are rare, but if you encounter one, please check our status page or contact our support team.
Here are some common error codes you may encounter:
400 | Bad Request | The request is malformed or contains invalid parameters. | Missing parameters, invalid JSON format, incorrect data types. | Validate request parameters, check JSON structure, and ensure required fields are included. |
401 | Unauthorized | Authentication is missing or invalid. | Missing API key, expired token, incorrect credentials. | Include a valid API key, a refresh authentication token, and verify credentials. |
403 | Forbidden | Client lacks permission to access the resource. | Insufficient user permissions, resource restrictions. | Ensure user has the required permissions, check access control settings. |
404 | Not Found | The requested resource does not exist. | Incorrect URL, resource deleted or moved. | Verify the request URL, check resource availability. |
405 | Method Not Allowed | HTTP method is not allowed for the endpoint. | Using GET instead of POST, or vice versa. | Use the correct HTTP method per the API documentation. |
429 | Too Many Requests | Too many requests hit the API too quickly | Exceeding rate limits | Examine rate limit headers, avoid aggressive retries, ID high-volume processes, and optimize if possible, Exponential backoff of your requests. |
500 | Internal Server Error | An unexpected error occurred on the server. | Server misconfiguration, unhandled exceptions. | Check server logs, debug application code. |
502 | Bad Gateway | Server received an invalid response from an upstream server. | API gateway issues, backend server down. | Check backend server health, retry request. |
503 | Service Unavailable | Server is overloaded or under maintenance. | High traffic, scheduled maintenance. | Retry after some time, check the API status page. |
504 | Gateway Timeout | Server did not receive a timely response from an upstream server. | Slow database query, network congestion. | Optimize backend response times, increase timeout threshold. |
What made this section unhelpful for you?
On this page
- Error Codes
Developer Tools
Postman Collections
To improve the developer experience, Forth will soon be providing users with a convenient way to access and interact with predefined API collections for our various products. By viewing or running these collections in Postman, users can easily test and explore various API endpoints and functionalities.
What made this section unhelpful for you?
On this page
- Developer Tools
Rate Limits
To ensure platform stability and fair usage for all clients, the Forth API employs rate limiting.
Handling Rate Limiting Errors
If you exceed the Request Rate Limit, you will receive an HTTP 429 "Too Many Requests" response code, and your API use will be restricted.
Resolution Options:
- Wait progressively longer before retrying requests. Avoid aggressive retries.
- Identify high-volume processes and optimize them (e.g., use bulk endpoints if available, implement caching).
- If you consistently hit limits due to legitimate high usage, contact us to discuss potential options.
What made this section unhelpful for you?
On this page
- Rate Limits
User Guides
Our User Guides provide step-by-step instructions and documentation to help you navigate and utilize the Forth API. These guides include best practices and troubleshooting tips to enhance your experience and create better applicausing the Forth API.
What made this section unhelpful for you?
On this page
- User Guides
Download a Contact List
This guide outlines the steps to follow for downloading a contact list using the CRM's API.
Step by Step Workflow
What made this section unhelpful for you?
On this page
- Download a Contact List
Core Objects
Our core objects represent the backbone of our APIs. Most, if not all, actions are tied to these core objects and are fundamental to the Forth ecosystem. These objects reflect key pillars of the debt settlement process, from Contacts (the consumers you intend to enroll), to Documents, to communication objects like the Call object to log conversations.
On this page
- Core Objects
Marketing
The Marketing APIs enable you to manage promotional campaigns, manage email marketing templates and more.
On this page
- Marketing
Platform Management
The Platform Management section provides functions to effectively manage various aspects of their platform settings. You can configure and customize settings related to account preferences, notifications, and user permissions.
On this page
- Platform Management
Servicing
The Servicing section of the API allows you to manage and update various settings and configurations for the common servicing functions of debt settlement workflows. This includes creditors, enrollment states, lenders, settlement offers, and transactions.
On this page
- Servicing
Utilities
The Utilities section provides various tools and functions to assist users in managing and manipulating data within the system. With this section, users can perform tasks such as searching for contacts by phone number and conducting lookups on institutions. Streamline your workflow and enhance data organization with the Utilities section.
On this page
- Utilities
User Guides
This section contains a user guide specific to the Clixsign feature. Clixsign is Forth's proprietary electronic document signing platform. To enable this platform, please contact Support@setforth.com.
What made this section unhelpful for you?
On this page
- User Guides
Request a Signature
This guide provides the steps you should follow to request a signature via Clixsign using the Forth API. To generate a document and send it to Clixsign, you must first have the following information available:
- The document template ID you wish to generate and send through Clixsign
- The contact ID you wish to originate the Clixsign request for
- The details of the various individuals or entities that are signers on the agreement
To successfully send a Clixsign document, complete the following steps.
1
Determine Document Template / Package To Be Sent For Signature
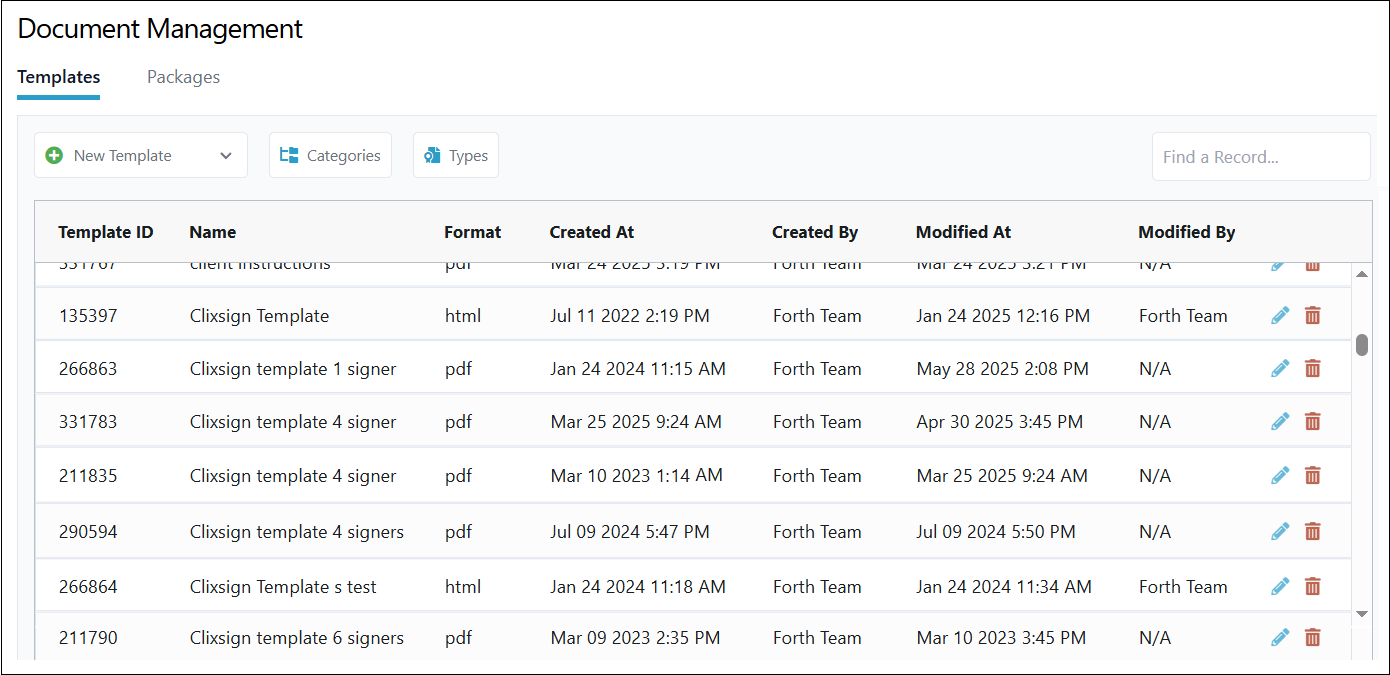
Your FORTH CRM account will contain various documents and document packages stored within the ‘Docs’ tab of your system. Navigate to this tab to see what documents you have available for generation, or retrieve them programatically via a GET request to the list-all-documents endpoint. You can retrieve all packages similarly through the documents tab UI or via the endpoint list-document-packages. You will need the corresponding ‘Template ID’ or ‘Package ID’ in the following step.
2
Generate Document Template/Package to Prepare For Signature
Next, use the generate-a-document endpoint or the generate-a-document-package endpoint, and reference the corresponding document template ID or package ID you wish to generate for a contact record. In the response, you will receive a doc_id that needs to be referenced in the following request.
 {
    "response": {
        "html": null,
        "doc_id": 37256536,
        "doc_data": {
            "signers": {
                "1": {
                    "signer_type": "Signature here",
                    "default": "contact",
                    "signatures": [
                        {
                            "type": "SIGNATURE",
                            "x": "78.138",
                            "y": "288.008",
                            "width": "110.959",
                            "height": "27.740",
                            "required": true,
                            "page": 0
                        },
                        {
                            "type": "INITIAL",
                            "x": "452.664",
                            "y": "325.468",
                            "width": "37.500",
                            "height": "18.750",
                            "required": true,
                            "page": 0
                        },
                        {
                            "type": "TEXTINPUT",
                            "x": "215.328",
                            "y": "335.734",
                            "width": "79.109",
                            "height": "10.788",
                            "required": true,
                            "page": 0,
                            "replaceable": {
                                "text": "Text",
                                "font": "droid_sans",
                                "size": 10,
                                "color": "#000",
                                "alignment": "left",
                                "bold": false,
                                "italic": false,
                                "wrap": true,
                                "fill": false
                            }
                        }
                    ]
                },
                "2": {
                    "signer_type": "",
                    "default": "manual",
                    "signatures": [
                        {
                            "type": "SIGNATURE",
                            "x": "226.709",
                            "y": "293.602",
                            "width": "52.397",
                            "height": "13.099",
                            "required": true,
                            "page": 0
                        }
                    ]
                },
                "3": {
                    "signer_type": "",
                    "default": "manual",
                    "signatures": [
                        {
                            "type": "SIGNATURE",
                            "x": "314.640",
                            "y": "290.496",
                            "width": "52.397",
                            "height": "13.099",
                            "required": false,
                            "page": 0
                        }
                    ]
                },
                "4": {
                    "signer_type": "",
                    "default": "manual",
                    "signatures": [
                        {
                            "type": "SIGNATURE",
                            "x": "405.155",
                            "y": "285.841",
                            "width": "52.397",
                            "height": "13.099",
                            "required": false,
                            "page": 0
                        }
                    ]
                }
            },
            "pages": [
                {
                    "width": 612,
                    "height": 792
                },
                {
                    "width": 612,
                    "height": 792
                }
            ],
            "filename": ""
        },
        "title": "Clixsign template 4 signer"
    },
    "status": {
        "code": 200
    }
}
Additionally, you should see a corresponding history event and document generated on the contact record in the CRM.

3
Send via Clixsign for Signature
The doc_id value from the previous request will now be used to send a document through Clixsign via the send-clixsign-document request with the ‘gen_id’ field in the request body.
Additionally, define the values of the signer as if you were generating the document for the contact record within the FORTH UI, including details such as the signer's name, email, and phone numbers, and whether they are receiving this document via email or SMS message.
 {
  "gen_id": 37256536,
  "request_settings": {
    "enforce_order": true,
    "expiration_date": "2025-07-18"
  },
  "notifications": {
    "email": {
      "message": "Thisis your document to sign"
    }
  },
  "signers": [
    {
      "signer_number": 1,
      "signer_type": "Contact",
      "signer_name": "Bob Test",
      "signer_email": "test@test.net",
      "signer_phone": 16665554444,
      "verbal_auth": true,
      "signer_notifications": {
        "email": true,
        "sms": false
      }
    }
  ]
}
Once all signers are defined and the request is sent, the Clixsign documents will be sent to their respective recipients via their specified delivery methods.
Once all documents have been signed, you should see the document status updated to ‘Completed’ within the contact record in the FORTH CRM.
What made this section unhelpful for you?
On this page
- Request a Signature
Create Signing Request
This endpoint allows you to initiate the sending of a Clixsign document to a specified client. By providing the necessary documents and signer details, you can trigger the document delivery process efficiently.
What made this section unhelpful for you?
On this page
- Create Signing Request